Static Recovery:
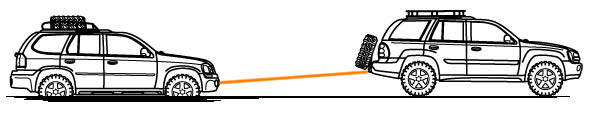
A static recovery derives the recovering force by steadily decreasing the length of the recovering system. Because this method is slower, it can provide much increased control and safety over a dynamic recovery.
Anchor Points:
Because of the recovery process here, the system needs an anchor. This can be a tree, a rock, or a pull-pal. When using a tree as an anchor point, it’s important to use a tree strap in order to follow the tread-lightly principles. Tree straps, although similar in appearance to dynamic straps, are static straps, and are not designed to stretch. Because of this, I always label my straps with a D or S at each end to denote dynamic or static. (Ialso label my straps with their WLL rating in lbs. in case the tag gets torn off.) The tree strap should be wrapped around the back side of the tree, and connected with a D-shackle. (Important, whenever using a screw-pin D-shackle, screw the pin in, and then loosen it by ½ turn to prevent binding when under load.) The D-shackle will then become your attachment point for your chain or winch rope.

When using a rock as your anchor point, it is appropriate to use a chain as an alternative to the tree strap, especially if the rock has sharp edges.
With both situations, the tighter the V where the ends come together, the less ‘extra’ load you induce on the tree-strap. For example, if the ends of the strap are inline and essentially laying on top of each other, each end of the strap is taking half of the entire recovery force. If the ends are somehow pointing directly towards each other and inline across the D-shackle, you are effectively inducing an infinite amount of force on each end. This is something to keep in mind, but unless the tree is 4’ in diameter, or you are using two trees, you won’t likely encounter a problem.
Depending on the size of the tree, you can position the tree strap at different levels. A large sapling (4”) can be a suitable anchor point, but the tree strap must be positioned at ground level. This is to reduce the bending stresses on the tree. If you place the strap too high, you may end up just pulling the tree out of the ground. As the trees become larger in diameter, you can place the strap higher on the trunk. This can actually produce a beneficial lifting component to the recovery process. If at any time during a recovery you hear loud popping sounds coming from the tree, stop and re-rig immediately.
A pull-pal is an interesting mechanism made to create an anchor point in sand, soil or snow, where there is no other suitable anchor point present. Read the manual before using one of these, as they present their own risks, and is not covered below.
Hi-Lift Hand-Winching:
The hi-lift winch kit (off road kit) can be a handy resource for an off-roader on a tight budget. The first step to this process is attaching the system together. It is important not to use a dynamic strap inline with this recovery because it will store energy and cause unpredictable movement of the hi-lift and vehicle. Since the user must be intimately close to the recovering hardware, safety is extra important here.
While chain is somewhat obsolete for off-road recovery these days, this is a situation where chain is integral to the system. The off-road winching kit comes with two attachments for the hi-lift. One attaches to the tongue, and a shorter one to the H-beam at the foot-end of the beam. Use a strap to attach the top end of the hi-lift to the vehicle’s recovery point. Next, set up your anchor point, and rig a chain to the anchor so that the free end of the chain slightly overlaps the chain coming off the lifting tongue of the jack.
The chain coming off the jack has grab-hooks attached to it, and should be fed over a link in the chain attached to the anchor. Make sure this connection is as tight as possible; otherwise you have to take up the slack when winching. Make sure the reversing bar on the hi-lift jack is in the up (or lifting) position, and begin actuating the jack handle. You should notice that any slack in the system is taken up, and that the vehicle will begin to move toward you step by step.
If you get to the end of the jack and still need to recover further, it is time to use the second, shorter length of chain attached to the bottom of the H-bar. With the vehicle’s weight still supported by the jack, the short chain’s grab hook is pulled tight, and connected to the main chain length. Put the handle alongside the H-bar, and switch the reversing bar on the jack to the down (lower) position. You will now transfer the weight of the vehicle onto the shorter length of chain by actuating the hi-lift handle until the lifting pins let go and the lifting mechanism runs freely along the length of the H-bar. At this point, your load is being held by the chain at the foot of the jack. Return the mechanism to the base of the hi-lift, raise the reversing bar to the lifting position, re-connect the longer length of chain (attached to the tongue) to the main chain, and begin actuating the jack handle again. Repeat these steps until you run out of chain or you don’t need to pull the vehicle any further.
If you do run out of chain, you will have to entirely re-rig your system. Before de-rigging, ensure the vehicle is secure by chocking tires, setting the parking brake, and putting the transmission into park.
Winch Recovery:
People often think that a winch recovery is the simplest. This is not the case, they are slow, and there are many facets to the operation, but it can often be the most sure-fire way to recover your vehicle. Winches produce enormous amounts of force, much greater than even a dynamic recovery in most cases. Unlike a dynamic recovery, the winch can produce these high levels of force over an extended period of time. For these reasons, there are a lot of safety issues to keep in mind when using a winch.
The first safety precaution is to ensure proper communication between the marshaller and the driver. I prefer the hand signals found in the figure below. A rotating finger pointed up means winch in, while a rotating finger pointing down means winch out. A palm held up means stop. To indicate bumping the trigger, winch in, make a motion like a ‘duck quack’. Each time the marshaller bumps his fingers together, the winch controller will bump the trigger. Two hands motioning towards the winch indicates that the marshaller is putting his hands in or around the winch. Be careful not to accidently hit the trigger, fingers can easily be severed.

To begin a winch recovery, first determine your anchor point. For now, we will assume this is a single line pull. For a winch, it is important to remember a couple things when choosing an anchor point. First, you want it to be at a distance where you will be pulling out most of the winch cable, and leaving at least 5 or 6 wraps on the drum. A winch’s max pulling force is directly related to the number of wraps on the drum, below the working length of cable. Wrapping cable on top of each other can also cause chafing between the coils of cable, and can sometimes produce kinks in the line.
The other thing to think about when setting up your anchor, is to position the anchor almost directly in front of the winch. A side-pull on the winch can induce more strain on the fairlead, but also makes the cable bunch up on one side of the drum. As before, this will lessen the strength of the pull, and can produce kinks in the line.
Once a suitable anchor point has been chosen and set up, connect the winch controller to the winch. If you are planning to winch from inside the vehicle (preferred unless you really need to keep a watch on the terrain), be sure to run the winch controller line where it will be kept safe. Tie a hitch around a brush guard, run it under the wiper, and wrap it around your rear view mirror before bringing it through the driver’s window. Winching from inside the vehicle is preferred, as it provides added protection against a broken winch line, allows the driver to control the vehicle heading, rev the engine (to increase output from the alternator), or give throttle to the wheels.
Put the winch in free spool mode by releasing the clutch, and pay the line out by hand. It takes much less time, and is much less strenuous on the winch to pay out by hand. It is important to wear loose fitting leather gloves when working with a winch cable. This can prevent your hands from getting torn by cable burrs. It can sometimes be helpful to do this before setting up the anchor point in order to determine the best positioning of the anchor point.
If using an open hook as the attachment mode to the anchor point D shackle, make the connection with the hook’s open side facing upward. In the event of any hook failure, this will make the hook fly into the ground, instead of into the air.
Engage the winch clutch, and begin to snug up the cable. This should be done by bumping the winch trigger until the cable is taught. This prevents the winch from encountering shock loads. If possible, keep back-tension on the cable during this process to ensure the winch line pays onto the spool smoothly. Otherwise the cable may jump around once tension is put on the line. Once the line is taught, re-check the anchor point to ensure the hook is seated properly.
When crossing over a winch cable, step on the cable. Always assume the rope can become live at any time. When there is tension on the winch line, never cross it. Walk around it. Use a ‘parachute’ on the winch line on each free-section of line. A parachute is a heavy blanket or other mass that helps minimize the backlash of a broken line.
It is then time to winch. Keep the engine running when winching to provide power back to the battery. A Once the vehicle is in a position to move forward under its own power, pull forward a bit to induce slack on the winch cable. Be sure not to drive over the cable, as it could get caught in a wheel or damage the winch or a suspension component.
Snatch Block (Pulley) Recovery:
A snatch block or split sheave pulley can be useful in three scenarios.
The first is a change of direction recovery. This would be a situation where you are not inline with, or in front of the stuck vehicle. A pulley can be used in this instance, anchored to a tree, to redirect the cable to the proper direction.
When using a pulley, always ensure the pulley and anchor point are rated to at least twice the capacity of the winch. While a change of direction recovery does not increase pulling capacity, keep in mind that it does induce up to twice the stress on the pulley anchor point because you have double the tension working against the pulley.
The second scenario for using a pulley is a double line (or more) winch recovery. This effectively doubles your winch’s rating by compounding the power. The best way to determine your compound factor is to count the number if free-line segments that are getting shorter during the recovery. If you have two line segments that get shorter, your potential pulling power is doubled.

To perform a double line winch recovery, run the cable out from your winch to the anchor point. Run the winch line through the pulley and back to the vehicle. Because this scenario has the potential to produce forces up to double the rating of the winch, it is important to ensure that your bumper is firmly mounted to the vehicle with appropriate hardware.
The third scenario for using a pulley involves running the winch line from the winch, through a pulley located at an anchor point, and then extending the remaining winch line to another anchor point. You may ask yourself, what is the point of that? If you remember, the winch obtains it’s highest pull rating when on the first wrap of the drum. If your only anchor point in front of you is 20 feet away, it can be appropriate to use a pulley here, and use a secondary anchor point at an appropriate distance so as to be pulling with the appropriate amount of cable on the drum.
There are also some misconceptions as to the multiplying factor of the pulley. Some people incorrectly believe that every pulley used in your system doubles the winching force. This is not correct, as the manner of rigging determines the force multiplication. The best way to determine the multiplication factor of a pulley is to count the number of line sections (free line between anchor points, pulleys, or vehicles) that get SHORTER during the winching process. If only one section of winch line is actually getting shorter during the process, your force multiplication factor is 1. This means your maximum recovery force is equal to 1 x the winch rating. If you have two sections of line that get shorter as you pull, you have a multiplication factor of 2. This means that your system CAN attain twice the rating of the winch, but also pull about twice as slow.


 When lifting with the jack, support the jack’s main H-beam with one hand until there are about two-to-three clicks of load on the lifting mechanism. At that point the user can allow the vehicle’s weight to hold the jack vertical. Try to ensure that the jack is as vertical as possible when lifting the vehicle; otherwise you will be exerting a side load on your vehicle, which could potentially lead to an unstable vehicle.
It is important to remember that the hi-lift is an inherently unstable tool. The base is not wide, which easily allows the jack to lean, or kick out when under load. The only way to prevent this is to ensure the vehicle is properly restrained. If you plan to lift the entire front end off the ground, engage your e-brake, locker, and chock the tires as necessary. If you are lifting the rear end, ensure that the front tires are chocked, or possibly have someone sit in the driver’s seat with their foot firmly on the brakes. If you are lifting at a rock slider, and are lifting an entire side off the ground, engage the e-brake, locker, and chock as necessary. Use common sense.
When lifting the body or frame, it should be noted that you will be lifting the body first, then the suspension. Because of this, it can sometimes be easier to lift directly from the wheels. This can be done by using the lift-mate. This accessory attaches over the lifting tongue of the jack and hooks to the wheel spokes. This is especially handy when the vehicle does not have steel bumpers or rock sliders.
If you are using the hi-lift on soft soil or mud, it is handy to have the off-road base. This does not increase the stability of the jack at all. It prevents the jack’s foot-plate from sinking into the muck as deep by spreading the load over a larger area.
A special use for the hi-lift actually utilizes the unstable nature of the hi-lift jack. This procedure can be especially helpful for getting a vehicle out of deep ruts. The key here is to lift the vehicle’s wheels out of the ruts with the hi-ligt, and then push the vehicle sideways. This method essentially ‘pole vaults’ the vehicle onto higher or more solid ground. Just remember to keep a foot on the bottom of the hi-lift to prevent it from kicking out.
Overall, the hi-lift has become a staple of off road travel because it is a simple tool that performs a simple function, and has done it well for many years. Before needing to use the hi-lift, practice with it, and learn to respect its instability. Remember to never climb under the truck with the hi-lift holding it up. When the vehicle’s weight is on the jack, always assume that the vehicle is unstable. If possible, someone should always maintain contact with the jack to help prevent it from kicking out.
Bridging Ladders / Sand Ladders:
There is a subtle, but important difference between sand ladders and bridging ladders. Bridging ladders can support the weight of the vehicle and span a distance equal to the length of the ladder. Sand ladders are not made to support the weight of a vehicle. Sand ladders are made as a traction adder and load spreader only. While a sand ladder cannot be used as a bridging ladder, a bridging ladder can be used as a sand ladder. Make sure you understand which product you have, and only use it in the proper manner.
Sand ladders are useful in muddy or sandy environments where flotation is key. Sand ladders can be used in conjunction with a hi-lift or they can be used independently. This often is determined by how quickly you realize you will need them. If you are already bogged down to the frame, you will likely need the lift in order to place the ladder under the tires. If you can merely not proceed forward, it can be a simple solution to back up a bit, insert the ladder, and proceed forward again and drive over the ladder. Another alternative to lifting the vehicle can be simply digging out the soil from in front of the tire, and inserting the ladder. Often the vehicle can climb right out of it’s ruts and onto the ladder. Another helpful item can be a piece of carpet, this can be used as a load spreading device similar to a sand ladder. If you don’t carry a load spreader of some kind, branches or brushwood can be used as an alternative.
When lifting with the jack, support the jack’s main H-beam with one hand until there are about two-to-three clicks of load on the lifting mechanism. At that point the user can allow the vehicle’s weight to hold the jack vertical. Try to ensure that the jack is as vertical as possible when lifting the vehicle; otherwise you will be exerting a side load on your vehicle, which could potentially lead to an unstable vehicle.
It is important to remember that the hi-lift is an inherently unstable tool. The base is not wide, which easily allows the jack to lean, or kick out when under load. The only way to prevent this is to ensure the vehicle is properly restrained. If you plan to lift the entire front end off the ground, engage your e-brake, locker, and chock the tires as necessary. If you are lifting the rear end, ensure that the front tires are chocked, or possibly have someone sit in the driver’s seat with their foot firmly on the brakes. If you are lifting at a rock slider, and are lifting an entire side off the ground, engage the e-brake, locker, and chock as necessary. Use common sense.
When lifting the body or frame, it should be noted that you will be lifting the body first, then the suspension. Because of this, it can sometimes be easier to lift directly from the wheels. This can be done by using the lift-mate. This accessory attaches over the lifting tongue of the jack and hooks to the wheel spokes. This is especially handy when the vehicle does not have steel bumpers or rock sliders.
If you are using the hi-lift on soft soil or mud, it is handy to have the off-road base. This does not increase the stability of the jack at all. It prevents the jack’s foot-plate from sinking into the muck as deep by spreading the load over a larger area.
A special use for the hi-lift actually utilizes the unstable nature of the hi-lift jack. This procedure can be especially helpful for getting a vehicle out of deep ruts. The key here is to lift the vehicle’s wheels out of the ruts with the hi-ligt, and then push the vehicle sideways. This method essentially ‘pole vaults’ the vehicle onto higher or more solid ground. Just remember to keep a foot on the bottom of the hi-lift to prevent it from kicking out.
Overall, the hi-lift has become a staple of off road travel because it is a simple tool that performs a simple function, and has done it well for many years. Before needing to use the hi-lift, practice with it, and learn to respect its instability. Remember to never climb under the truck with the hi-lift holding it up. When the vehicle’s weight is on the jack, always assume that the vehicle is unstable. If possible, someone should always maintain contact with the jack to help prevent it from kicking out.
Bridging Ladders / Sand Ladders:
There is a subtle, but important difference between sand ladders and bridging ladders. Bridging ladders can support the weight of the vehicle and span a distance equal to the length of the ladder. Sand ladders are not made to support the weight of a vehicle. Sand ladders are made as a traction adder and load spreader only. While a sand ladder cannot be used as a bridging ladder, a bridging ladder can be used as a sand ladder. Make sure you understand which product you have, and only use it in the proper manner.
Sand ladders are useful in muddy or sandy environments where flotation is key. Sand ladders can be used in conjunction with a hi-lift or they can be used independently. This often is determined by how quickly you realize you will need them. If you are already bogged down to the frame, you will likely need the lift in order to place the ladder under the tires. If you can merely not proceed forward, it can be a simple solution to back up a bit, insert the ladder, and proceed forward again and drive over the ladder. Another alternative to lifting the vehicle can be simply digging out the soil from in front of the tire, and inserting the ladder. Often the vehicle can climb right out of it’s ruts and onto the ladder. Another helpful item can be a piece of carpet, this can be used as a load spreading device similar to a sand ladder. If you don’t carry a load spreader of some kind, branches or brushwood can be used as an alternative.

![tbmisc3[1]](http://thedownings.us/offroad/wp-content/uploads/2016/03/tbmisc31.jpg)